FreeBSD on Linode
Judging from the Google search results, this is a pretty hot-button issue… there are plenty of claims it works, but no one wants to say how it’s done. What follows is a rough essay taken directly from my notes, which was repeated multiple times so I believe I got all the kinks out of it, and ended up with a “working” FreeBSD 8.1-R i386 installation on a Linode. I say “working” because it has a tendency to crash under heavy load – there’s clearly still much work to be done on FreeBSD’s paravirtualization code.
Note: These instructions worked for me, but I can’t guarantee there’s not something I did by “muscle memory” and didn’t document. I repeated this process about 6 or 7 times, and each time found something new I’d forgotten to write down. It also stands to reason that these instructions may stop working at any point, for any reason – I can’t provide support for these instructions as by the time you read this I will likely not have a Linode any longer. 🙁
First, you’ll need a Linode, if you don’t already have one – any size will do, depending on what you actually want to do with it… but there’s no minimum Linode size for FreeBSD itself. Then next thing you’ll want to do is file a ticket with support – Linodes default to vcpus=4, which will choke FreeBSD at the moment. They won’t increase this setting of course, but they will happily lower it for you. Simply give them your Linode # and ask them to reduce vcpus to 1 and they’ll make the change. You can continue setting everything up, they’ll just tell you that the Linode needs to be powered off and restarted before the setting will take effect – which we’ll do when we go to boot FreeBSD anyway – and chances are by the time they respond you’ll be about ready to reboot into FreeBSD for the first time.
Configuring the Disks
Go into the Linode manager, and trash any existing configuration it may have generated for you, along with any disks. Create a new disk image, 64MB should be plenty, and make it ext2 – we’ll be using this disk to store our FreeBSD kernels, PV-GRUB’s configuration, that sort of thing.
Next, create a ~512MB or so raw disk, which we’ll be dd’ing a FreeBSD image over in a rather nasty fashion. Make it whatever size you need for your image, most FreeBSD “minimal” images weigh in at around 200MB or so, so 512MB should be plenty.
Finally, use up the rest of your disk space with another “raw” disk image, which is where our main FreeBSD installation will live.
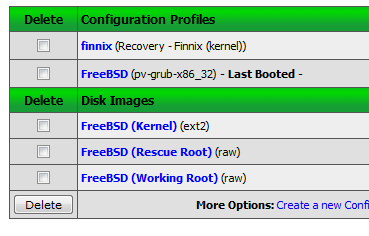
Setting up Profiles
Next, create a new profile… I called mine “finnix” but you can call it “Linux Rescue” or anything you like. Set it’s kernel as “Recovery (finnix)”, set xvda to the “recovery – finnix (iso)”, xvdb to your ext2 kernel storage disk, xvdc to your temporary FreeBSD root (the littler one), and set the initrd to “finnix (initrd)”.
Create another new profile, we’ll call this one “FreeBSD”. Set kernel to pv-grub, 32-bit (might be called x86_32 or something), xvda is your kernel store, xvdb is your main FreeBSD disk, xvdc is your “rescue” FreeBSD disk.
Note: laying the disks out this way will have the unfortunate side-effect of having your main disk live on xbd1 in FreeBSD – there’s no way around this, the ext2 disk has to be disk zero for GRUB to run unattended. 🙁
Booting into finnix
Finnix is a “live CD” style Linux, which will work from a RAMdisk and not occupy or otherwise hold any disks, leaving you free to do things like dd images over them and such. Now we need a kernel – you have two options here. One, you can build one yourself on another machine, put it on a webserver, and curl it across; or two you can use the one graciously provided by Aprogas in this forum thread. If you decide to use his images (I did to bootstrap the process), I’d suggest mirroring them someplace yourself in case you screw up and need to do it multiple times.
If you’re building your own kernel, see the notes below – at the time of writing the default XEN kernel won’t work.
Now we need to put our kernel in place:
# mount /dev/xvdb /mnt
# curl https://path.to/kernel.gz | gunzip > /mnt/kernel
# umount /mnt
Now extract and write the image over your temporary root disk:
# curl https://path.to/root.img.gz | gunzip > /dev/xvdc
Sync (I’m not sure if this is necessary, but it’s a habit) and reboot:
# sync
# reboot
From the Linode manager or LISH, boot your FreeBSD profile. You should end up at the grub menu, so point it directly at your kernel (I’m led to believe chain loading the BSD loader won’t work under paravirtualization):
grubdom> kernel (hd0)/kernel
grubdom> boot
Because we bypassed the FreeBSD loader, it’s extremely probably FreeBSD won’t know where to find it’s root partition. We’ll point it at our temporary root partition:
mountroot> ufs:/dev/xbd2s1a
You should now have booted FreeBSD, and be able to login as root (you’re on the console, and if you’re using Aprogas’s image, there will be no password on root at the moment).
Installation
There’s a lot of gotchas in this portion, so try and pay attention to what you’re doing (and don’t rely on me). First thing to do is fdisk /dev/xbd1 and note the geometry, because for some reason the fdisk inside sysinstall won’t be able to tell it, and will set it to 0/0/0, which will cause sysinstall to blow up when you try to partition the drive.
Start sysinstall, and go into fdisk. Set your geometry as noted before (mine was: cylinders=2015 heads=255 sectors/track=63), and then use the entire disk for a Freebsd slice. Write your changes, then back out to the label editor. Create your partitions how you’d like them… for testing I just made a 512MB swap (not sure if I’d need it or not), and then used the rest of the disk for one giant partition. Set the mountpoints for your partitions with root as /mnt, because / is already in use at the moment. Write your changes out, no boot loader (I’m pretty sure it doesn’t work anyway) then bail out of sysinstall.
When you’re out of sysinstall, mount all your partitions under /mnt, because for me they wouldn’t stay mounted inside sysinstall. You might need to newfs them, I did sometimes and didn’t others.
Back into sysinstall, go into options and pick your OS version (any kernel you’re likely to build is going to have -pX on the end of it, which will not be a valid FTP path for installation), and then make sure you set the install root to /mnt.
Back out, and do a standard install, without clobbering any of your partitions. I can’t recall if you need to set the geometry again if you’re not actually writing anything out. Select your distributions and install them, if you’re using Aprogas’s images the network is already configured (DHCP). Let it fly.
Once you’re out of sysinstall, make sure all your partitions are mounted, then configure /mnt/etc/fstab the way it should be… it’s very likely sysinstall didn’t wind up making one, but if it did, it may not be sane – it may have /mnt as the mount points for everything, and you’ll want to set them back to /.
Also ensure that /mnt/etc/rc.conf is correct – it may not even exist. You probably want at least sshd_enable=”YES” in it. Finally, chroot /mnt, set a root password, and create at least one non-root account. Make sure it’s in wheel.
Exit chroot, unmount everything and reboot. At the grub profile again:
grubdom> kernel (hd0)/kernel
grubdom> boot
Then this time at the kernel’s “where the hell is my root partition” prompt (actual location of your root partition may vary):
mountroot> ufs:/dev/xbd1s1d
If everything went according to plan, you should be inside of a working FreeBSD installation at this point… but it won’t boot unattended. If your kernel has ext2fs compatibility, you can fix that from inside FreeBSD (otherwise it’s back to finnix). Either way, mount your kernel store partition under say, /mnt, then:
# mkdir -p /mnt/boot/grub
# cat > /mnt/boot/grub/menu.lst
default 0
timeout 5
title FreeBSD
kernel (hd0)/kernel
^D
# umount /mnt
Now PV-GRUB should boot unattended (sidenote, i have “timeout 5”, but for some reason grub instantly boots freebsd). I haven’t figured out how to pass the root partition to the kernel yet, so see the notes below about compiling that into the kernel.
Compiling a new Kernel
8.0-RELEASE kernels will boot and apparently function fine in Linode if they’re built with the XEN configuration. Anything newer will panic on boot because of the new x86bios stuff, which is called from atkbd, but Linodes don’t actually use the atkbd device (console functions fine without it)…
… so copy the XEN config to something (I called mine “LINODE”) and edit it. I commented out the lines for atkbd, aktbdc, kbdmux, and psm – though I’m not sure all that is necessary.
If you haven’t already got it, you’ll likely want “options EXT2FS” so you can install new kernels without shipping them off to another machine and rebooting into finnix. Finally, you’ll need to tell FreeBSD kernel where to find it’s root partition so I used:
options ROOTDEVNAME=\"ufs:xbd1s1d\"
Build and install your new kernel, noting that it’ll land in /boot/kernel. You need to get it over to the kernel store where GRUB can find it – if you have EXT2FS compatibility, that’s as simple as mounting the ext2 partition in /mnt, and cp /boot/kernel/kernel /mnt/kernel. Unmount all partitions and reboot.
At first I didn’t have EXT2FS compatibility, so I had to gzip the kernel, scp it to another webserver, boot into finnix and curl it back the same way we initially got the kernel up.
Finally, at the time of writing you’ll be spammed with messages (approximately one every 10 seconds) about the “hypervisor wallclock nudging TOD”. It doesn’t appear to effect anything, so I commented this message out in the kernel sources (sys/i386/xen/clock.c:344 at the time of writing)… that’s probably bad, but that’s up to you.
One more boot, and the Linode should boot completely unattended, including when it falls and can’t get up and lassie needs to restart it. Which will happen. A lot.